Copilot CLI Setup: Install, Sign In, Trust a Folder, Add MCP Servers, Write Instructions and Pick a Model
A complete Copilot CLI setup for one repo: install, sign in, trust the folder, add two MCP servers, write instructions, deny git push and choose a model.

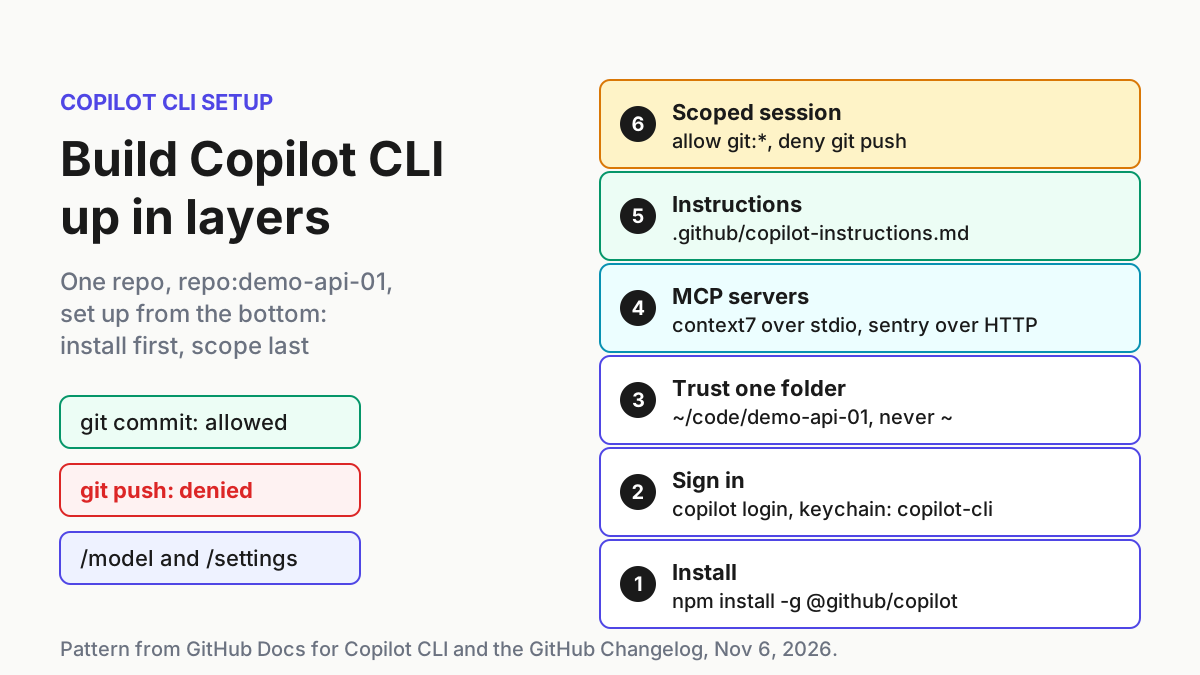
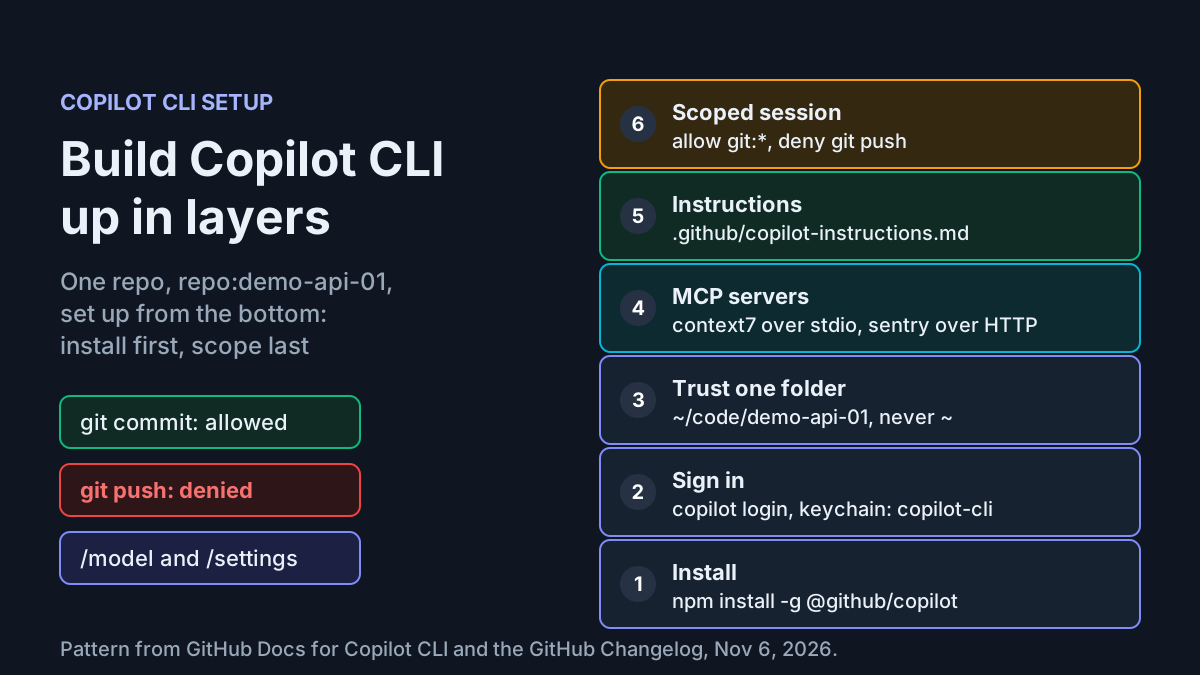
You installed GitHub Copilot CLI, typed copilot in some folder and accepted a trust prompt without reading it. Three questions are still open: which token is it using, which directories can it touch, and why doesn’t the MCP server you added last week show up? This guide does a copilot cli setup once, on purpose, on one illustrative repository called repo:demo-api-01. When you finish, the CLI is installed and you know how to update it. It is signed in with a credential you chose, trusted in that one project folder and nowhere above it, and connected to a local stdio MCP server and a remote HTTP server. It reads a repository instruction file and runs in a session that can commit but can’t push.
Every Copilot command, flag and file path below comes from GitHub’s documentation for the CLI, linked where it is used. Output blocks and table rows marked illustrative show what you should expect to see. They are not transcripts from a test run. Where the official pages this guide could check leave a detail open, the text says so and names the page to read.
One recent change makes this a good time to do it. GitHub’s weekly Copilot release notes for November 2, published November 6, 2026, say that /settings in Copilot CLI now opens one dashboard for plugins, MCP servers and more, and that you can search across all of your settings. That gives you a single place to inspect your setup. It doesn’t decide what to trust, which token to use or which tools to allow. Those decisions are what this guide covers.
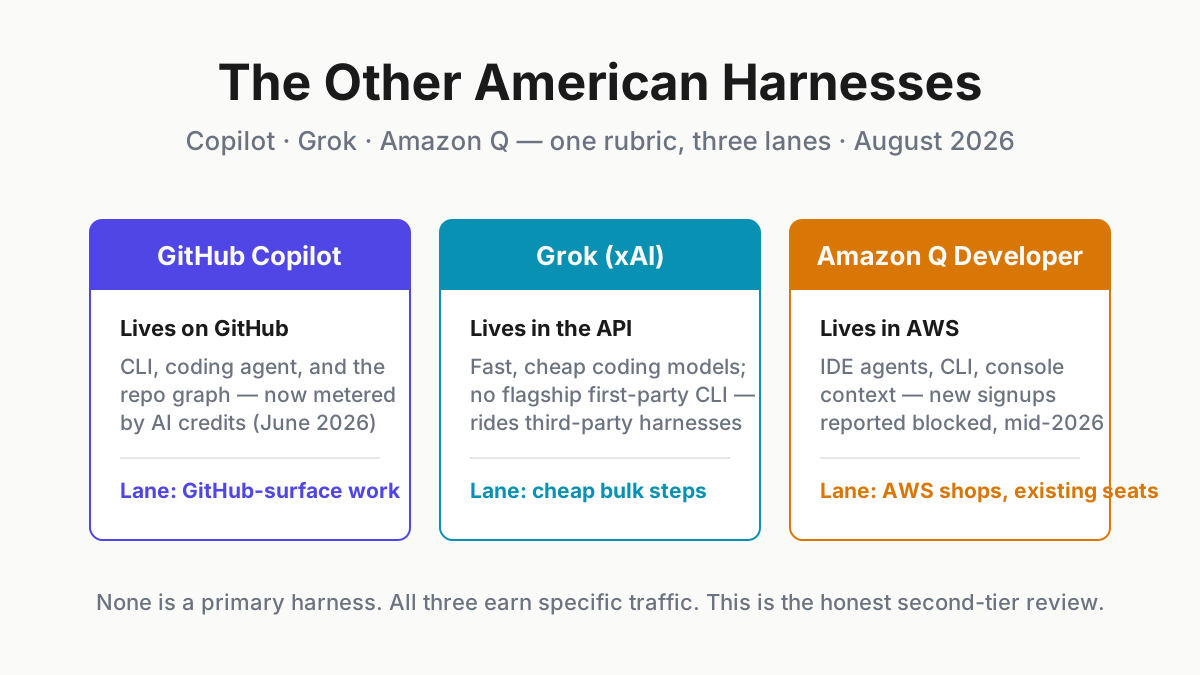
If you run Copilot CLI behind a proxy, the sandbox egress change is covered separately in Copilot CLI sandbox proxy egress. Permission rules that administrators enforce are in managed permissions users can’t override. To see where Copilot CLI sits next to other agent CLIs, read GitHub Copilot CLI, Grok and Amazon Q.
What you finish with, and what to have ready
This guide is for a developer who wants Copilot CLI as a daily tool on macOS, Linux or Windows and would rather make each trust and permission decision once, deliberately, than click through prompts as they come. Set aside about thirty minutes and use a clone you don’t mind an agent editing.
- [ ] An active Copilot plan. Copilot CLI is available on every Copilot plan, but if your seat comes from an organization or enterprise, the Copilot CLI policy must be enabled there, and an owner or administrator can turn it off (installation guide).
- [ ] Node.js 22 or later if you install with npm. Otherwise use WinGet on Windows, Homebrew on macOS or Linux, or the install script on macOS or Linux.
- [ ] PowerShell 6 or later if you’re on Windows.
- [ ] A test repository. This guide uses an illustrative clone at
~/code/demo-api-01, called repo:demo-api-01 below. - [ ]
npxon your path for the local MCP server. It ships with Node.js. - [ ] A browser on the same machine for the default sign-in flow, or a phone or second computer for the device-code flow if you work over SSH.
The illustrative case uses these values throughout:
| Setting | Value in repo:demo-api-01 |
|---|---|
| Repository path | ~/code/demo-api-01 |
| Stdio MCP server | context7, started with npx -y @upstash/context7-mcp |
| HTTP MCP server | sentry at https://mcp.sentry.dev/mcp |
| Repository instructions | .github/copilot-instructions.md |
| Session rule | allow shell(git:*), deny shell(git push) |
None of these values is special. Once the pattern works, swap in your own repository and servers.
Step 1: Install or update the CLI
Pick one installer and stick with it. The same command also updates the CLI, and if you mix installers you end up with two copies on your path that update separately. GitHub’s installation page lists four routes under one heading, Installing or updating Copilot CLI:
# npm, all platforms (needs Node.js 22 or later)
npm install -g @github/copilot

# WinGet, Windows
winget install GitHub.Copilot

# Homebrew, macOS and Linux
brew install --cask copilot-cli

# Install script, macOS and Linux
curl -fsSL https://gh.io/copilot-install | bash
- Choose npm if you already manage Node.js versions. Choose WinGet or Homebrew if you want the OS package manager to handle updates. Choose the script if you need a specific directory or a pinned version.
- If your
~/.npmrccontainsignore-scripts=true, use the override GitHub documents:npm_config_ignore_scripts=false npm install -g @github/copilot. With scripts disabled, an install can look finished and then misbehave the first time you run it. - With the script,
PREFIXsets the install directory andVERSIONpins a release.PREFIXdefaults to$HOME/.localfor a normal user and/usr/localwhen run as root. Pinning is how you roll back later. - Every route has a prerelease build:
@github/copilot@prerelease,GitHub.Copilot.Prereleaseandcopilot-cli@prerelease. Keep them off any machine you rely on. - Check that the binary responds with
copilot help, which prints the command list.copilot help environmentlists the environment variables the CLI reads, which matter in Step 2.
# Illustrative: pinned install into your home directory
curl -fsSL https://gh.io/copilot-install | VERSION="v1.0.113" PREFIX="$HOME/.local" bash
command -v copilot   # expect a path under $HOME/.local/bin
copilot help
The VERSION value is illustrative. GitHub’s own example pins an older release. v1.0.113 is the version GitHub’s authentication page gives as the minimum for Microsoft Entra sign-in, so it makes a reasonable floor. Pin the release you have tested. The install page refers to the CLI command reference for the dedicated update command, but that reference was too large to verify for this guide. The update method shown here is to re-run whichever installer you chose.
Step 2: Sign in and check which credential wins
Copilot CLI accepts several kinds of credential, and the one you intended isn’t always the one it uses. Settle this before anything else. Model requests, the built-in GitHub MCP server, GitHub code search and /delegate all use the same GitHub authentication (authentication guide).
- Run
copilot loginin a normal terminal. On a local desktop it starts the browser flow. Over SSH, and in Codespaces, dev containers and CI, it defaults to the device-code flow. To force one or the other, add--web-flowor--device-code. - Approve the sign-in in the browser. If your organization uses SAML SSO, click Authorize next to each organization you need, then click Authorize GitHub Copilot CLI.
- The terminal should print a success line with your handle, in the form
Signed in successfully as Octocat. - Inside a session,
/usershows the active account,/user listshows every account you’ve signed in with, and/user switchchanges accounts. - For a headless machine, create a fine-grained personal access token. Set the resource owner to your personal account, not an organization, and add the Copilot Requests permission on the Account tab. Then export the token as
COPILOT_GITHUB_TOKEN.
copilot login --device-code
# Illustrative output in an SSH session:
# To authenticate, visit https://github.com/login/device and enter code 1234-5678
# Waiting for authorization...
# Signed in successfully as your-handle.
The OAuth token is stored in the operating system’s keychain under the service name copilot-cli. That means Keychain Access on macOS, Credential Manager on Windows and libsecret (GNOME Keyring or KWallet) on Linux. If no keychain is available, for example on a headless Linux server without libsecret, the CLI asks whether to save the token in plain text at ~/.copilot/config.json. Decline unless the machine is single-user and disposable. Installing libsecret, or supplying COPILOT_GITHUB_TOKEN from a secret store, is the cleaner fix.
Next, check the order in which the CLI looks for credentials. Most wrong-account surprises come from this:
| Order | Credential source | What to watch |
|---|---|---|
| 1 | COPILOT_GITHUB_TOKEN |
Applies to Copilot CLI only, so other tools are unaffected |
| 2 | GH_TOKEN |
Often set for the GitHub CLI, and it silently beats your login |
| 3 | GITHUB_TOKEN |
In Codespaces, the automatically injected one doesn’t beat a /login account |
| 4 | OAuth token in the keychain | What copilot login stored |
| 5 | gh auth token fallback |
Used only when nothing above exists |
Two rules come with this table. First, classic personal access tokens (prefix ghp_) are not supported, so exporting an old classic token makes authentication fail instead of falling back to your login. Second, a variable you exported for another tool overrides the account you just signed in with, and the CLI doesn’t warn you. Before you rely on the session, run env | grep -E 'COPILOT_GITHUB_TOKEN|GH_TOKEN|GITHUB_TOKEN' and unset any variable you don’t want the CLI to use.
Step 3: Trust repo:demo-api-01, not your home directory
Everything else in this guide depends on trust. When you start a session, Copilot CLI asks whether you trust the files in, and below, the folder you launched it from. In a trusted folder, Copilot may read, modify and execute files (configuration guide, usage guide).
- Run
cd ~/code/demo-api-01, thencopilot. - Read the prompt. Option 1 trusts the folder for this session only. Option 2 trusts it for this session and future ones. Option 3 (Esc) ends the session.
- For repo:demo-api-01, choose option 2. It’s a clone you control and will work in every day.
- Never choose option 2 in your home directory or a parent folder such as
~/code. Trust covers everything below the folder, so trusting~would cover every repository, dotfile and credential file under it, including~/.copilotitself. - If one task needs files from another directory, add it with
/add-dir /path/to/directoryrather than trusting a broader folder. To move the whole session, use/cwd. - To review or undo permanent trust, open
~/.copilot/config.json(on Windows,$HOME\.copilot\config.json) and edit thetrustedFoldersarray. If you setCOPILOT_HOME, this whole directory moves there.
Trust also controls repository MCP configuration. Project-level .mcp.json and .github/mcp.json files load only after you confirm trust, and in untrusted folders they are skipped without any message. If a teammate’s committed MCP server never appears, check trust before you debug the server.
Trust and path permissions are separate controls. By default, the CLI can access the working directory, its subdirectories and the system temp directory. --disallow-temp-dir removes temp access. --allow-all-paths turns path checking off and belongs only in an isolated environment. GitHub also warns that path detection for shell commands is heuristic. It can miss paths inside complex shell constructs, and it doesn’t expand custom variables such as $MY_PROJECT_DIR.
Step 4: Add a stdio and an HTTP MCP server
Copilot CLI includes GitHub’s MCP server by default, so you only add the others you want (MCP guide). This example adds two: Context7, which runs as a local process over stdio, and Sentry, a remote server over Streamable HTTP. Both commands write to your user configuration file, ~/.copilot/mcp-config.json.
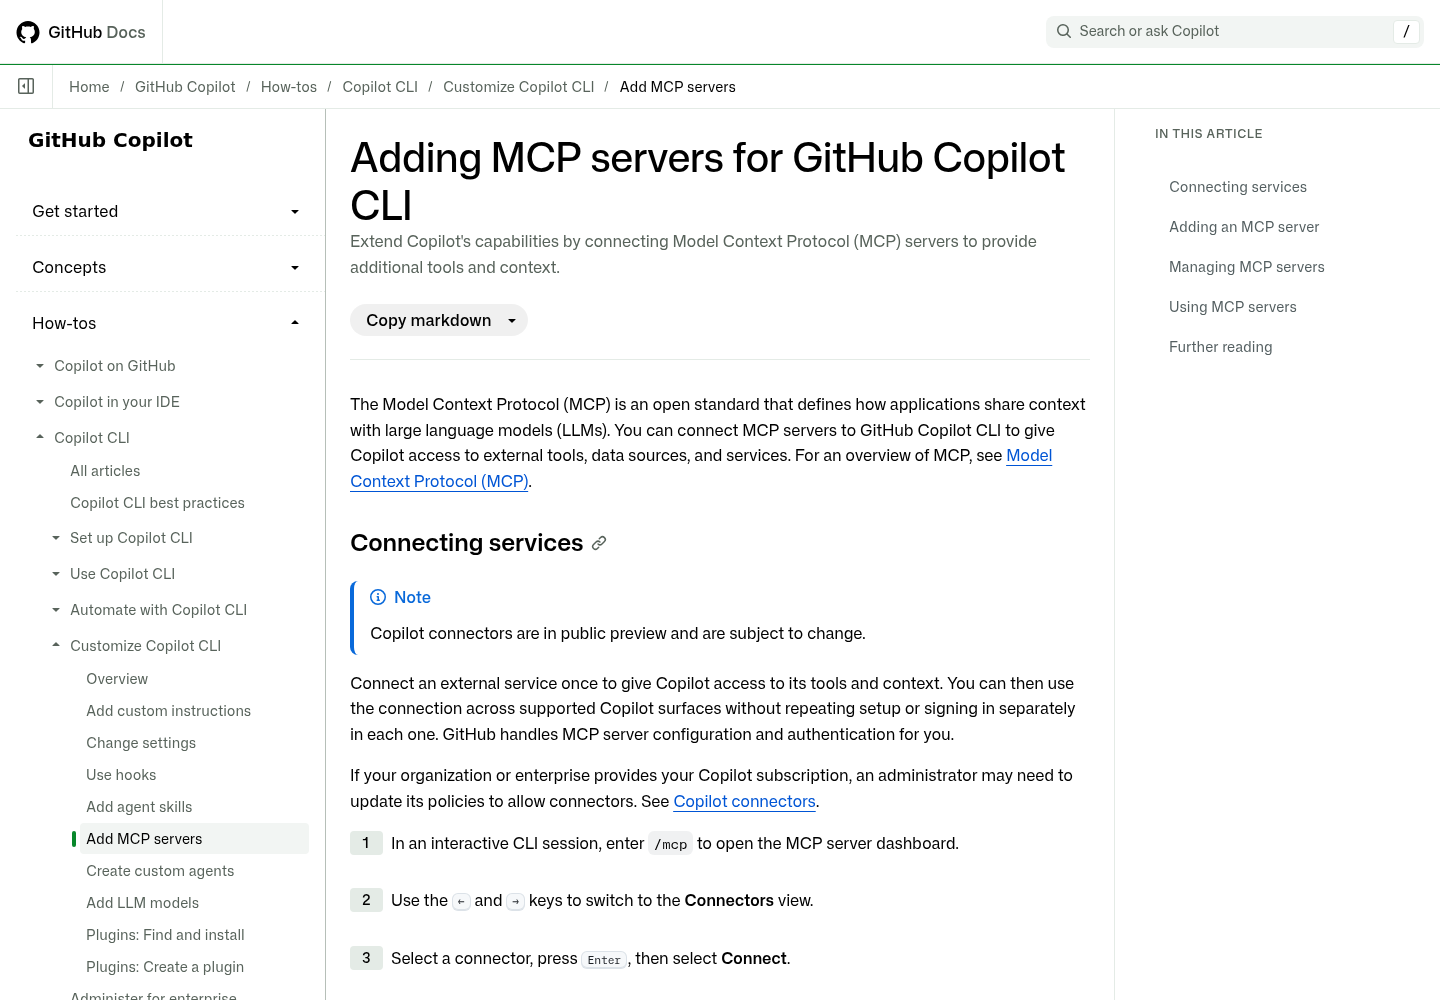
-
Add the local server. Everything after
--is the command the CLI runs to start it:copilot mcp add context7 -- npx -y @upstash/context7-mcp -
Add the remote server with the HTTP transport. This is the Sentry example from GitHub’s usage guide:
copilot mcp add --transport http sentry https://mcp.sentry.dev/mcp -
List what the CLI sees from every source (user, workspace and plugin), then inspect one server:
copilot mcp list copilot mcp get context7 # type, status and tools; add --json for scripts -
Inside a session,
/mcpopens the dashboard,/mcp show sentryshows one server’s status and tools, and/settingsopens the searchable dashboard that covers MCP servers and plugins. -
Treat server names as permission handles. In Step 6 you refer to a single tool as
context7(tool_name)and to a whole server assentry, so choose short names that won’t change.
One developer noted on X that the /settings dashboard helps when an agent can’t find a tool you just configured. That matches the workflow here: add the server from the terminal, then confirm it in the dashboard before you prompt.
If you’d rather edit the file directly, here is a hand-written ~/.copilot/mcp-config.json that is equivalent, in the format GitHub documents: local for stdio servers and http for remote ones.
{
  "mcpServers": {
    "context7": {
      "type": "local",
      "command": "npx",
      "args": ["-y", "@upstash/context7-mcp"],
      "env": {},
      "tools": ["*"]
    },
    "sentry": {
      "type": "http",
      "url": "https://mcp.sentry.dev/mcp",
      "tools": ["*"]
    }
  }
}
The tools array works the same way as --tools on the command line: * for every tool, a list of names to enable only those, or an empty value to enable none. For a remote server that needs a key, pass --header on the command line or add a headers object to the file, and keep real keys out of any file you commit. GitHub’s pages don’t describe Sentry’s own sign-in. If copilot mcp get sentry shows the server isn’t working, follow Sentry’s instructions for that part.
To share a server with collaborators, commit .github/mcp.json in the repository, or keep a personal .mcp.json in your checkout. If the same server name appears in more than one file, the file closest to your working directory wins, and any project-level definition beats ~/.copilot/mcp-config.json. If .mcp.json and .github/mcp.json sit in the same directory, .mcp.json takes precedence. Copilot CLI doesn’t read .vscode/mcp.json, whose top-level servers key it doesn’t support. If your organization has configured an MCP registry and allowlist policy, only the servers that policy permits will run, whatever you add. For the same task in other agent CLIs, compare Codex MCP setup and Claude Code MCP scopes.
Step 5: Write repository instructions Copilot loads
Custom instructions are Markdown files in a repository that Copilot automatically adds to the prompts you send while working there (usage guide). Copilot CLI supports three kinds: repository-wide instructions in .github/copilot-instructions.md, path-specific files that match .github/instructions/**/*.instructions.md, and agent files such as AGENTS.md.
- Create
.github/copilot-instructions.mdin repo:demo-api-01 and write the rules a new contributor would need on day one. - Make every rule checkable: a command, a path or a prohibition, not general guidance on style.
- Commit the file so every clone, and every teammate, gets the same context.
- Start a new session so the file is in context from the first prompt.
- Test it with a question that only the file can answer.
# demo-api-01: instructions for Copilot

## Build and test
- Install dependencies with `npm ci`, never `npm install`.
- Run tests with `npm test`. A change is not done until the tests pass.

## Code layout
- HTTP handlers live in `src/routes/`. Shared validation lives in `src/lib/validate.ts`.
- Do not edit files under `migrations/`. Propose a new migration instead.

## Git
- Write commit messages as `area: short summary`.
- Never push. A human pushes after review.
Illustrative check: ask How should I run this repo’s tests, and are you allowed to push? The answer should name npm test and decline to push, citing the repository rule. If you get a generic answer, the file isn’t being loaded. Check the exact path, and make sure the session started in the trusted repository root.
The last rule repeats Step 6’s deny rule on purpose. An instruction is guidance the model reads. A --deny-tool rule is enforced by the CLI. Keep both, and never rely on an instruction alone to prevent something destructive.
Add path-specific files once the repository-wide file works. The GitHub pages verified for this guide confirm only where those files go: .github/instructions/**/*.instructions.md. The header that limits a file to certain paths is documented on GitHub’s page Adding custom instructions for GitHub Copilot CLI, which wasn’t in the verified source set, so copy that syntax from GitHub’s page rather than from memory. The verified sources also document no command that lists loaded instruction files, so the test question above is the practical check.
Step 6: Start a scoped session and choose a model
Read-only operations, such as searching, reading files and read-only shell commands, are generally allowed automatically. Editing files, running destructive shell commands and accessing URLs require permission (tool permissions guide). Command-line rules let you answer some of those prompts in advance for one session.
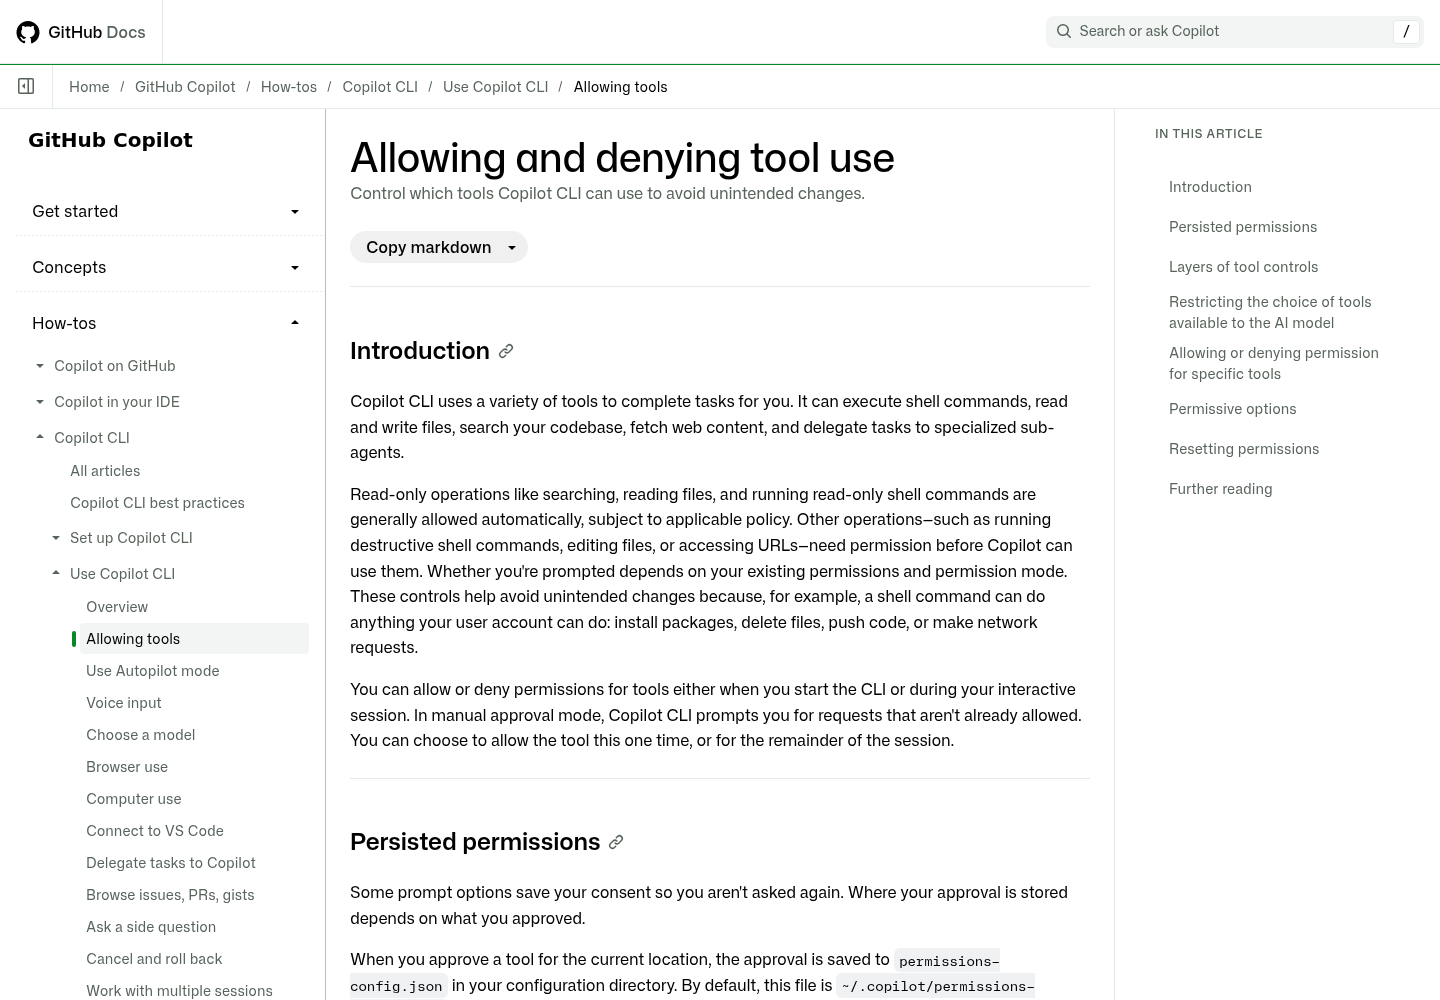
-
Start the scoped session for this example:
cd ~/code/demo-api-01 copilot --allow-tool='shell(git:*)' --deny-tool='shell(git push)' -
Here is what the two flags do.
shell(git:*)allows every git command without asking. Forgitandgh, rules can name a first-level subcommand, soshell(git push)denies onlygit push. -
Deny rules always beat allow rules, including
--allow-alland approvals you saved earlier. That’s why combining the two flags is safe. -
If you want, limit which tools the model can see at all. GitHub’s restricted example is
--available-tools='bash,edit,view,grep,glob' --allow-tool='shell(git:*)' --deny-tool='shell(git push)'. With it, Copilot can explore, edit and commit, but it can’t reach the internet, run arbitrary subagents or push.--excluded-toolsremoves specific tools instead. If you pass both options, the CLI uses the--available-toolslist and ignores--excluded-tools. -
The same syntax works for MCP servers.
--deny-tool='sentry'blocks every Sentry tool for the session, and--allow-tool='context7'lets Context7’s tools run without prompting. -
Choose a model with
/model. The picker shows the models your account and organization allow./usagethen shows tokens per model and the GitHub AI Credits used in the session, which is how you’ll notice an expensive choice. -
Test the limit with a real prompt: Stage the README change, commit it with the message docs: update README, then push.
Illustrative expected result: the commit runs without a prompt, and the push is refused by the deny rule. Copilot then reports that it can’t push, and you push yourself after review.
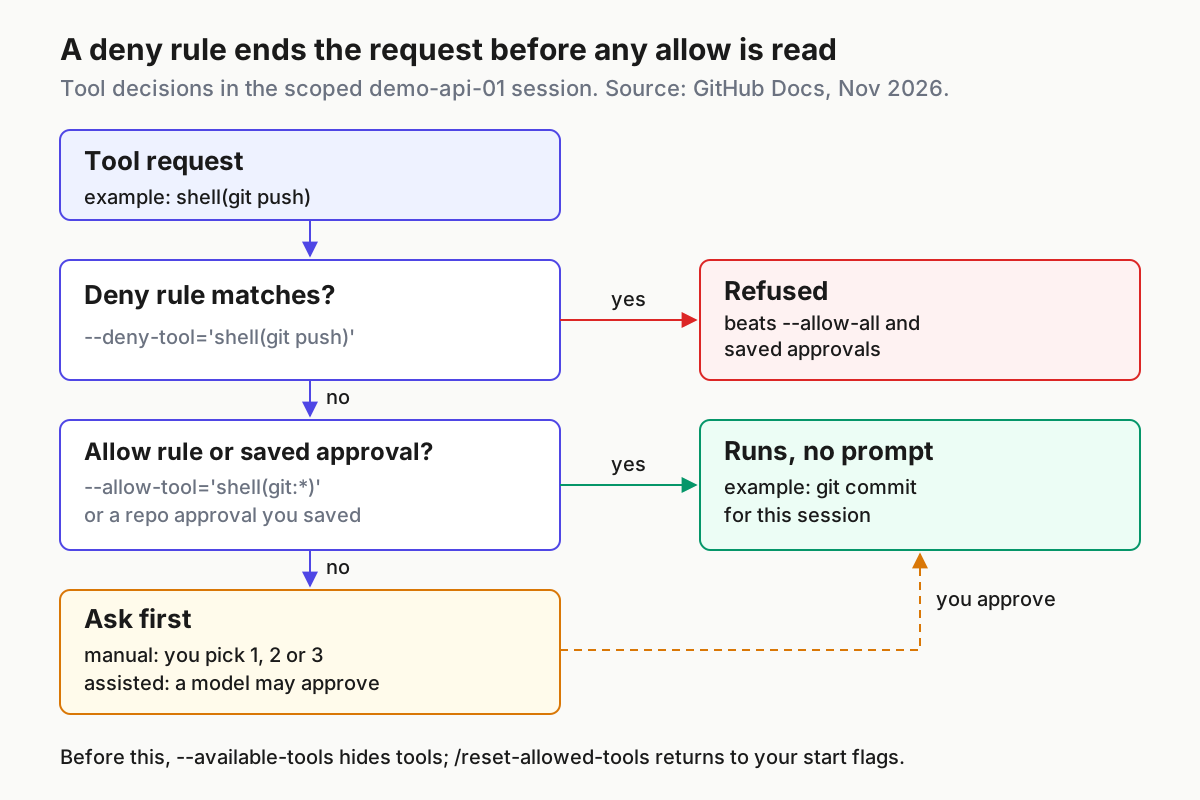
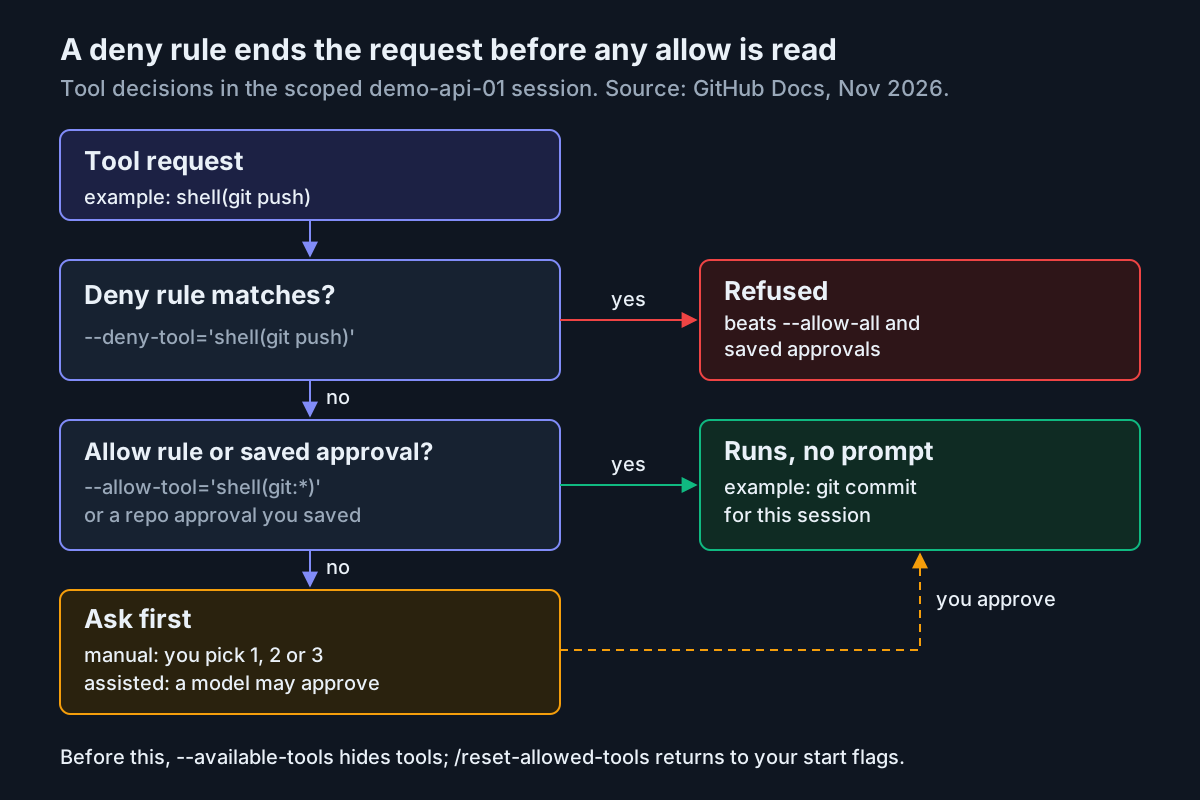
These flags apply only to the current session and are never written to permissions-config.json. Your answers to prompts can be saved, though. Choosing don’t ask again in this repo writes an approval to ~/.copilot/permissions-config.json, scoped to the repository root. Approving a URL permanently adds its domain to allowedUrls in ~/.copilot/settings.json, and that applies across all sessions. Be careful with the session-wide option in the prompt as well: Yes, and approve TOOL for the rest of the running session approves that tool with any arguments. Approve one rm that way and rm -rf ./* also runs without asking later in the session.
To get fewer prompts without granting blanket permission, run /permissions assisted. A model then approves eligible requests it judges safe, while your rules and any enterprise rules still apply. /permissions manual switches back, and /permissions show reports the current mode. To make assisted the default for new interactive sessions, set defaultPermissionMode to assisted in your user configuration file. Don’t put --allow-all or --yolo in a shell alias. GitHub warns against it and recommends those options only in an isolated environment or a sandbox. To see how these modes compare with other CLIs, read one house dialect for permission modes.
/settings covers the rest of your personal configuration. On its own it opens the searchable editor. /settings show KEY prints one value, and /settings KEY VALUE sets one, which also works in programmatic sessions started with -p. Pressing Ctrl+R on a highlighted setting restores its default. GitHub’s configuration-directory reference lists every key. This guide sets only the permission mode above.
The worked example, row by row
Each row is one illustrative step for repo:demo-api-01. The results are what you should expect to see, not output captured from a test run.
| Input | Action | Expected result |
|---|---|---|
| repo:demo-api-01 install-01: macOS, Node.js 22 installed, Copilot CLI not installed yet | npm install -g @github/copilot, then copilot help |
The install finishes and copilot help prints the command list. If ~/.npmrc sets ignore-scripts=true, run it again with npm_config_ignore_scripts=false |
| repo:demo-api-01 auth-01: desktop terminal, no Copilot token variables exported | copilot login |
The browser opens. After you click Authorize GitHub Copilot CLI, the terminal prints Signed in successfully as your-handle, and /user shows that account |
repo:demo-api-01 auth-02: same shell, with GH_TOKEN left over from the GitHub CLI |
Start a session and run /user |
The GH_TOKEN account is active instead of your login. Run unset GH_TOKEN and restart to use the keychain token again |
repo:demo-api-01 trust-01: first launch in ~/code/demo-api-01 |
copilot, then choose option 2 at the trust prompt |
No trust prompt the next time you launch from this folder, and the path appears in trustedFolders in ~/.copilot/config.json |
| repo:demo-api-01 mcp-01: no user MCP servers yet | copilot mcp add context7 -- npx -y @upstash/context7-mcp, then copilot mcp add --transport http sentry https://mcp.sentry.dev/mcp |
copilot mcp list shows context7 and sentry along with any workspace or plugin servers, and /mcp show context7 lists its tools |
repo:demo-api-01 mcp-02: a teammate’s .github/mcp.json committed, folder trusted |
Start copilot in the repository root |
The project server loads. In an untrusted clone of the same repository it is skipped without any message |
repo:demo-api-01 instr-01: .github/copilot-instructions.md from Step 5 committed |
New session. Ask how to run the tests and whether Copilot may push | The answer names npm test and declines to push, citing the repository rule |
repo:demo-api-01 perm-01: session started with --allow-tool='shell(git:*)' --deny-tool='shell(git push)' |
Prompt: commit the README change, then push | git commit runs without a prompt, and git push is refused by the deny rule |
| repo:demo-api-01 model-01: same scoped session | Run /model, choose a permitted model, then run /usage |
The picker lists only the models your account or organization allows, and /usage shows token use per model for the session |
| repo:demo-api-01 reset-01: earlier you chose don’t ask again in this repo for an npm command | /reset-allowed-tools |
Saved approvals for this location are removed from permissions-config.json. Permissions return to the flags the session started with, and the mode returns to manual |
When something fails: symptoms and fixes
Use this table when one of the steps doesn’t produce its expected result. Each fix uses a documented command or setting.
| Symptom | Likely cause | Fix |
|---|---|---|
| Copilot CLI won’t work on an organization seat, although other Copilot features do | The organization or enterprise has disabled the Copilot CLI policy | Ask an owner to enable it. Nothing on your machine can override the policy |
| An npm install finishes but the CLI misbehaves | ignore-scripts=true in ~/.npmrc skipped the install scripts |
npm_config_ignore_scripts=false npm install -g @github/copilot |
| Sign-in offers to save the token in plain text | No system keychain, as on headless Linux without libsecret | Install libsecret, or decline and supply COPILOT_GITHUB_TOKEN from a secret store |
| The session uses the wrong account | GH_TOKEN or GITHUB_TOKEN exported for another tool |
Unset the variable and check with /user |
| A token is rejected | It’s a classic ghp_ token, or a fine-grained token owned by an organization |
Create a fine-grained token owned by your personal account with Copilot Requests |
| The browser never opens over SSH | The browser flow can’t reach the local loopback callback | Use copilot login --device-code |
| A committed project MCP server is missing | The folder isn’t trusted, the file is .vscode/mcp.json, or the organization allowlist blocks the server |
Trust the folder, move the definition to .mcp.json or .github/mcp.json, or ask about the allowlist |
Project servers are skipped in copilot -p |
Prompt mode can’t show the trust prompt | Trust the folder interactively first, or deliberately set GITHUB_COPILOT_PROMPT_MODE_WORKSPACE_MCP=true |
| A server fails or slows down every session | Wrong command, URL or header | copilot mcp disable NAME, fix it with /mcp edit NAME, then copilot mcp enable NAME |
| Copilot runs a command without asking that you approved only once before | An earlier session-wide approval, or a saved repo approval | /reset-allowed-tools, then review permissions-config.json |
--allow-all or /yolo is refused |
A Copilot Business or Enterprise administrator has blocked it | Expected behavior. Use scoped --allow-tool rules instead |
If the problem is still there, copilot help permissions and copilot help config print the CLI’s own reference for permissions and configuration, and /feedback in a session lets you file a bug report.
Roll back or remove the setup
Your setup is stored in a few predictable places. Before you remove anything, know which file holds which decision, so you undo exactly what you meant to.
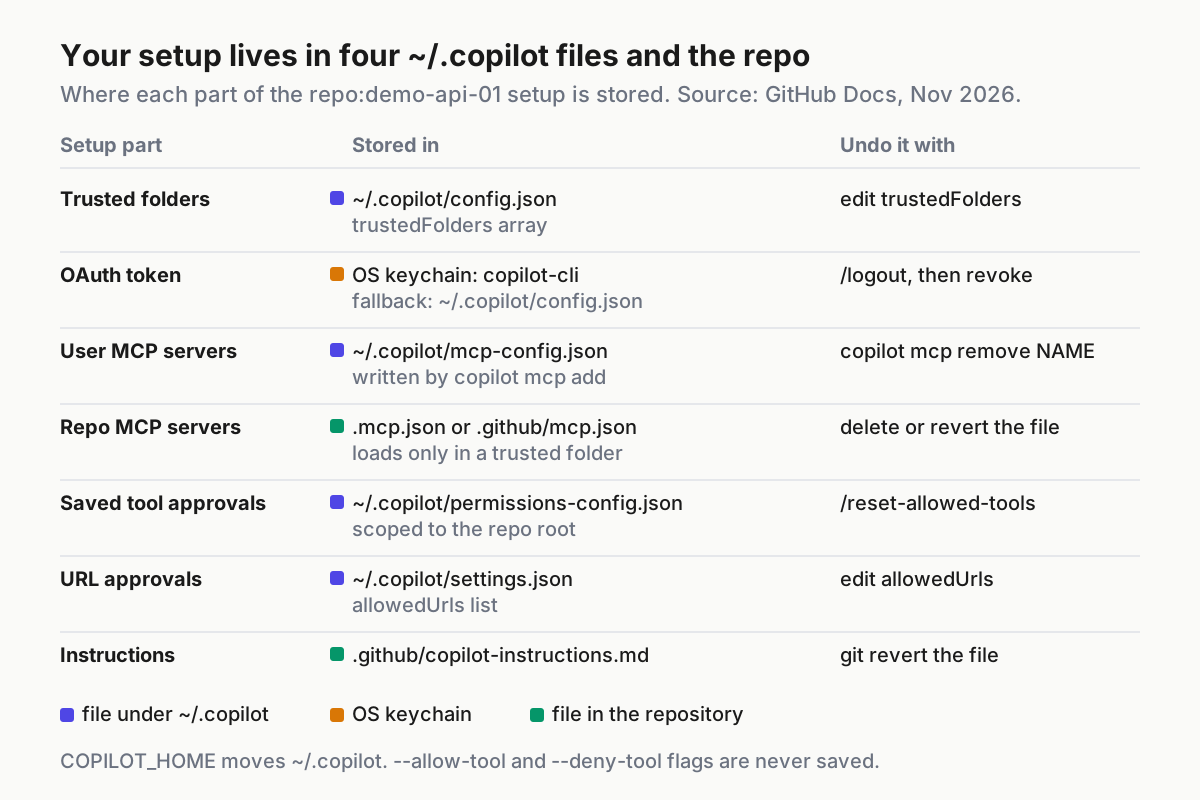
Work from the narrowest change to the broadest:
- Clear approvals first. Run
/reset-allowed-toolsin the repository. It clears this location’s saved tool approvals and directory permissions frompermissions-config.jsonand returns the mode to manual. To remove saved approvals for other locations, edit or delete their entries in that file. - Stop or remove MCP servers.
copilot mcp disable sentrykeeps the definition but stops Copilot using it, across sessions.copilot mcp remove sentryandcopilot mcp remove context7delete the user entries. Delete or revert any project.mcp.jsonor.github/mcp.jsonwith git. - Remove trust. Delete the repository path from
trustedFoldersin~/.copilot/config.json. - Sign out, then revoke.
/logoutremoves the locally stored token but doesn’t revoke it on GitHub. To revoke it, go to Settings, Applications, Authorized OAuth Apps, open the menu next to GitHub Copilot CLI and choose Revoke. Revoke any fine-grained token you created, and unsetCOPILOT_GITHUB_TOKENwherever you exported it. - Roll back the version if an update caused the problem. Re-run the install script with
VERSIONset to the last release that worked, as in Step 1. - Uninstall if you’re removing the CLI completely. GitHub’s install page doesn’t document removal, so use each package manager’s standard command:
npm uninstall -g @github/copilot,winget uninstall GitHub.Copilotorbrew uninstall --cask copilot-cli. For a script install, delete thecopilotbinary under$PREFIX/bin. - Clear local state last. Back up
~/.copilot, or$COPILOT_HOMEif you set it, then remove it. It containsconfig.json(trust, and a plain-text token if you accepted one),mcp-config.json,permissions-config.jsonandsettings.json, plus any user-level custom agents in~/.copilot/agents. - Revert
.github/copilot-instructions.mdwith git if the repository shouldn’t keep it.
Revoke tokens before you delete ~/.copilot. If you delete the directory first, a plain-text token in an old backup or another machine’s copy stays valid until it expires.
Where this setup fits
Once repo:demo-api-01 works, apply the same steps to every repository you use: trust each folder separately, add MCP servers where they are needed, and start each session with explicit deny rules. If you run Copilot CLI alongside other agent CLIs on the same machine, you’ll eventually need one view of all their sessions and approvals. The trade-offs are covered in running multiple AI coding agents without the chaos. Use the /settings dashboard to check what is configured, and rely on the flags and files above to control what Copilot is allowed to do.
Sources
- GitHub Copilot weekly releases, November 2 (GitHub Changelog, Nov 6, 2026)
- Installing GitHub Copilot CLI (GitHub Docs)
- Authenticating GitHub Copilot CLI (GitHub Docs)
- Configuring GitHub Copilot CLI (GitHub Docs)
- Allowing and denying tool use (GitHub Docs)
- Adding MCP servers for GitHub Copilot CLI (GitHub Docs)
- Using GitHub Copilot CLI (GitHub Docs)
- Dekrov on X: Copilot CLI /settings tip (Nov 14, 2026)